
Whether you love it or hate it, video conferencing is the new normal, and it’s here to stay. For team meetings and catch-ups we can be content to use our in built webcams, but what about important presentations, sales meetings, or coaching sessions? There are times when we want to make a little more of an impression, and in this blog I will outline a few simple techniques and principals to help you add a touch of class to your zoom-pearance… (that’s zoom and appearance stapled together!), and get the most out of your webcam.
Webcams
Most laptops have a webcam of sufficient quality these days, but the real issue with webcams is the framing. We end up with a close up shot at an upward angle towards the face because of the tilt we want to have on our laptop screens. It’s okay, it’s not great.

The simple solution is to get hold of an external HD webcam. Mount the webcam a good few feet behind and above your laptop. This will achieve a much more professional ‘news reporter’ style shot, which includes your desk and your laptop in the frame.

Lighting
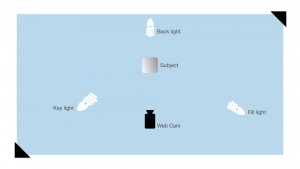
We want to avoid the extremes. Poor lighting delivers a dark and often fuzzy picture as software tries to digitally lighten the image. Too much light and the image will be blown out. If we’re going for a super professional look, then we want to aim for three sources of light; a key light, a fill light, and a back light.
The key light is the main source of light in the video, and for our purposes is best placed at a 45degree angle from the subject, at a downward angle replicating sunlight. Light sources that are at an upward angle produce the unsettling horror movie look, and we certainly aren’t aiming for that! The fill light should be less bright than the key light, and fills in some of the shadows that are caused by the key light. And lastly, the back light creates separation between the subject and the background, creating a stronger silhouette. These light sources could be artificial, studio lights or even lamps, or you can just as effectively utilise natural light through windows, by placing yourself at the right angle from the window. In most scenarios, a combination of natural light and a lamp in the background will be perfect. What we are aiming for is a well lit subject, with some subtle shadows on one side of the face, separated from the background.
Background
You might think the plainer the background the better, and in some context you would be right. However, sitting up against a blank wall is not actually the most aesthetically pleasing choice. Don’t be afraid to have a dynamic and colourful background with books, shelves, lamps, or artwork in view. Just be sure there is nothing inappropriate or compromising in the frame! For a really professional look, get as much space between yourself and the background as you can in the room. This gives a sense of 3D depth to the frame, in comparison to sitting close to a wall which can feel claustrophobic and one dimensional.
So there you have it, three simple ideas that you could implement to take your zoom game to the next level.